On LinkedIn, your email address is used for mainly two purposes, for logging in to your account and for sending you the emails. The email you’ve provided to LinkedIn at the time of creating your account is the primary email address. You can change this as well as add more email addresses to your account. Here the interesting thing is that you can use both primary and additional emails for logging in to your account. LinkedIn allows you to change the email address in your account easily and quickly whenever you want. Moreover, it is not necessary to do this from the website. If you prefer to use the app , you can also do it from there. Here is how to change or add a new email address to your LinkedIn account.
How to change or add the email address from the LinkedIn mobile app
Apps are always comfortable and uncomplicated to use. You can perform most of the jobs easily on the app. The reason is applications are easy to understand. If you want to use the app for changing the email address on your LinkedIn account, then use these steps.
1. Launch the ‘LinkedIn’ app on your mobile.
2. If you’re not logged in, then log in with the account in which you want to change or add the email address. In case the account is already opened, then verify whether it is the right one.
3. Tap the ‘Sign In’ option.
4. Enter the email address associated with your LinkedIn account, enter the password and tap ‘Sign In’ to continue.
5. Now, tap on the ‘Profile’ icon at the bottom right corner in iPhone and top right corner in Android.
6. Tap the ‘Cog’ icon to go to Settings.
7. Make sure you’re in the Account tab.
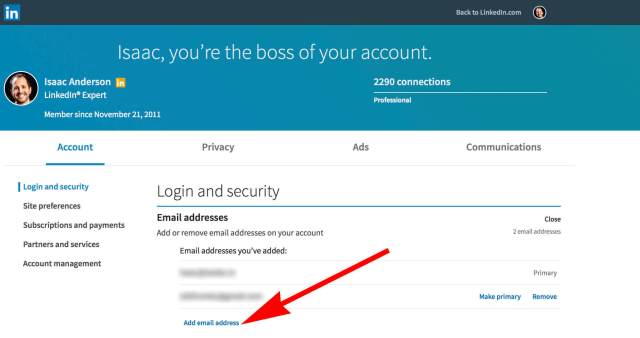
8. ‘Email addresses’ is on the top in the Account tab, tap on it.
9. Tap the large blue ‘Add email address’ button at the lower side of the screen.
10. Tap the ‘Email address’ text field and enter the email address you want to add or replace.
11. Then tap the ‘Password’ text field and provide your LinkedIn account password that you use to sign in into your account.
12. Tap the large blue ‘Submit’ button to continue.
13. Then tap ‘Done’. LinkedIn will now send a verification mail to the email address you’ve entered. You’ll need to verify the email address by using the link provided in the LinkedIn message.
14. Access the inbox of the registered email.
15. Open the message from LinkedIn Security with the subject “Confirm your email”. If you don’t find the message in your inbox, check in the spam folder.
16. Then tap the verification link given in the message.
17. After verifying the email address, come back to the ‘LinkedIn’ app.
18. And, tap on the ‘Make Primary’ link. You’ll find the link just below the email address you’ve added and verified.
19. Once again, you’ll be asked to provide your LinkedIn account login password.
20. Enter the password and tap the ‘Done’ button.
Your newly added email address will become the primary email address. Now, you can use this to sign into your Linked account.
To add the email address from the LinkedIn website:
• Sign in with your account on “LinkedIn.com”.
• Select ‘Settings & Privacy’ form the “Me” dropdown.
• Click on ‘Email address’ and follow the same process as changing through the app.
Apps are always comfortable and uncomplicated to use. You can perform most of the jobs easily on the app. The reason is applications are easy to understand. If you want to use the app for changing the email address on your LinkedIn account, then use these steps.
1. Launch the ‘LinkedIn’ app on your mobile.
2. If you’re not logged in, then log in with the account in which you want to change or add the email address. In case the account is already opened, then verify whether it is the right one.
3. Tap the ‘Sign In’ option.
4. Enter the email address associated with your LinkedIn account, enter the password and tap ‘Sign In’ to continue.
5. Now, tap on the ‘Profile’ icon at the bottom right corner in iPhone and top right corner in Android.
6. Tap the ‘Cog’ icon to go to Settings.
7. Make sure you’re in the Account tab.
8. ‘Email addresses’ is on the top in the Account tab, tap on it.
9. Tap the large blue ‘Add email address’ button at the lower side of the screen.
10. Tap the ‘Email address’ text field and enter the email address you want to add or replace.
11. Then tap the ‘Password’ text field and provide your LinkedIn account password that you use to sign in into your account.
12. Tap the large blue ‘Submit’ button to continue.
13. Then tap ‘Done’. LinkedIn will now send a verification mail to the email address you’ve entered. You’ll need to verify the email address by using the link provided in the LinkedIn message.
14. Access the inbox of the registered email.
15. Open the message from LinkedIn Security with the subject “Confirm your email”. If you don’t find the message in your inbox, check in the spam folder.
16. Then tap the verification link given in the message.
17. After verifying the email address, come back to the ‘LinkedIn’ app.
18. And, tap on the ‘Make Primary’ link. You’ll find the link just below the email address you’ve added and verified.
19. Once again, you’ll be asked to provide your LinkedIn account login password.
20. Enter the password and tap the ‘Done’ button.
Your newly added email address will become the primary email address. Now, you can use this to sign into your Linked account.
To add the email address from the LinkedIn website:
• Sign in with your account on “LinkedIn.com”.
• Select ‘Settings & Privacy’ form the “Me” dropdown.
• Click on ‘Email address’ and follow the same process as changing through the app.
